
Discover how to streamline your Git commit and push processes using a robust toolkit comprising Husky, ESLint, lint-staged, Commitlint, and simple Shell scripts. This guide will help you automate and standardise your version control workflow, ensuring consistency and efficiency in your development projects. Dive into practical setups and tips to make your Git operations seamless and error-free.
Introduction
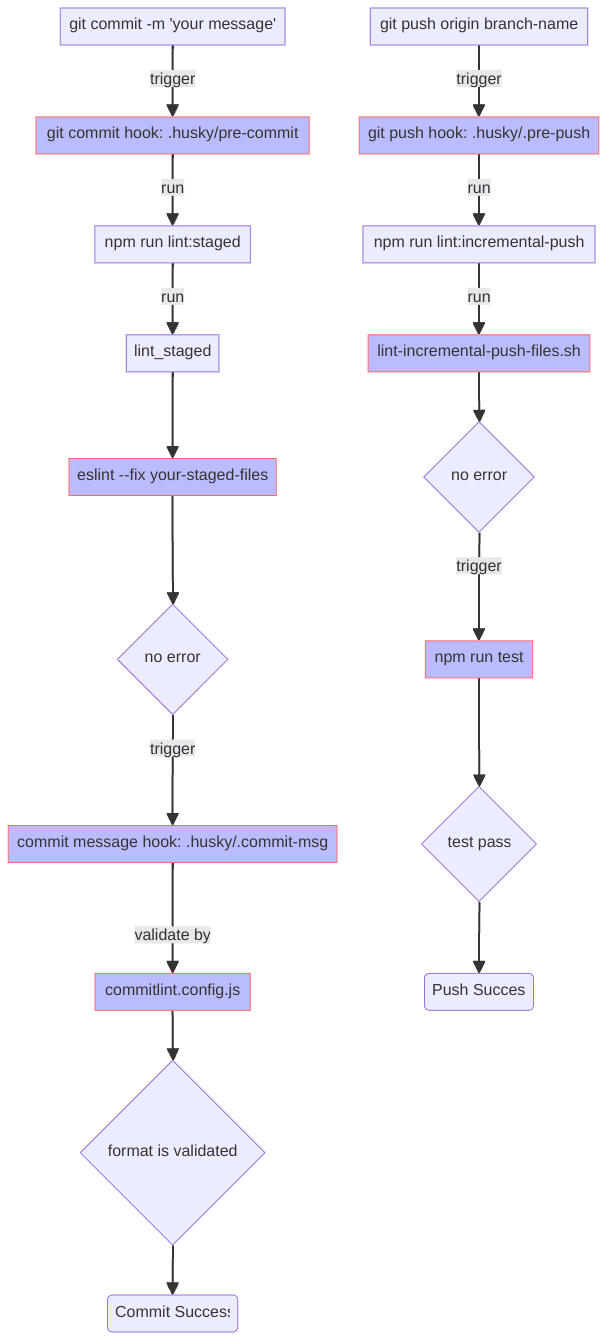
Today's topic revolves around leveraging Git Hooks to streamline Git workflows, focusing on code linting before commits and pushes, and standardizing the format of commit messages.
Git Hooks are essentially custom scripts that trigger during key Git actions.
There are two categories of Git Hooks: client-side and server-side. Client-side hooks are activated by operations such as committing, merging, and pushing, whereas server-side hooks are triggered by network operations, like receiving pushed commits.
In this post, I will primarily discuss client-side hooks. I'll delve into three specific hooks: pre-commit, commit-msg, and pre-push. The central tool discussed will be Husky, which simplifies the configuration of Git Hooks, making it more straightforward.
Here’s a preview of what I will cover in this post:
GitHub Repo
If you'd prefer to run the demo I've created instead of following the steps individually, check out this GitHub repository for a quick overview and hands-on experience.
Table of Contents
I would like to outline all the steps I'm gonna elaborate on in this post.
Tedious? Don't worry, each step is clear and straightforward. Most of the time, you can copy and paste my commands and codes to follow the guide.
-
- 2.1 - Create Pre-Commit Hook
- 2.2 - Code Linting
- 2.3 - Integrate Linting into the Pre-Commit Hook
- 2.4 - Brief Sum-Up
3 - lint-staged
-
5 - Git Push Hook
- 5.1 - Incremental Code Linting
- 5.2 - Force test Before Push
- 5.3 - Force Push
1. Init your Project (if you haven't)
Init NPM
mkdir normalise-your-git-commit-and-push && \
cd normalise-your-git-commit-and-push && \
npm init -y && \
npm pkg set type="module"
Init Git Repo
git init && \
echo 'node_modules' >> .gitignore
2. Git Pre-Commit Hook
The Git Pre-Commit Hook is triggered just after you execute the git commit command, but before the commit message editor is opened (if you are not using the -m option), or before the commit is finalized (if you are using the -m option).
What is commit message editor?
The most simple way of specifying our commit message is to execute git commit -m 'my commit message'. However, there's a more interactive way to commit using git commit.

After you run git commit without the -m option and commit message, Git typically opens an editor for you to enter a commit message (This editor could be Vim, Emacs, Nano, or whatever your default command-line text editor is set to).
Returning to the Git Pre-Commit Hook, it is triggered before the editor is opened, or before Git receives you commit message if you're using -m.
We can use it to perform checks (such as running the ESLint command), and if these checks fail, the commit action is blocked.
By sharing this hook script, you can ensure that every teammate commits only code that has been checked.
Let's explore how we can accomplish this.
2.1. Create Pre-Commit Hook
Install Husky
The first important step is to install Husky.
npm install -D husky@9
Init Husky
npx husky init
It's necessary to break down what primarily happens after the execution of husky init.
- Create the directory
.husky/_and add the configuration ofhooksPath = .husky/_to.git/config.
The .husky/_ contains the actual hook scripts that Husky will execute in response to specific Git events.
By setting hooksPath = .husky/_, it tells Git to look for hooks in the .husky/_ directory instead of the default .git/hooks.
- Create executable scripts such as
.husky/_/husky.shand.husky/_/hetc.
.husky/_/husky.sh is the primary script that Husky injects into the hooks it manages, and .husky/_/h is its Shortcut.
- Create a script
.husky/pre-commitwith the commandnpm test.
This executable file is the actual Git Pre-Commit Hook we mentioned before, whatever user-defined behaviours you want to add should be placed here.
It's invoked by .husky/_/husky.sh.
The npm test in it means: You want to commit the code? Oh, you have to pass the test first.
- Create the
preparecommand inpackage.jsonwith the execution ofhusky.
Anyone who clones your Git repo and runs npm install will automatically invoke the prepare script. Then, husky will initiate .husky/_ and configure .git/hooks.
- Create a
.gitignorein.husky/_with a single line*.
This prevents everything inside .husky/_ from being pushed to the remote repository.
Why should .husky/_ be excluded from Git version control?
The scripts under .husky/_ should be generated dynamically according to different environments' configurations and behaviors (machines, operating systems, CI environments, etc.).
For example, the Windows system uses \ as a path separator, while Linux uses /. Each system may have Node.js installed in a specific path. Each system may have its own Node.js version.
...
You cannot create scripts that can be universally applied unless you're working inside the specific environment.
Try A Commit
Since our pre-commit hook has been initiated, let's try it.
git add .
git commit -m 'first commit'
Here is what you'll see from the terminal console:

It fails because the pre-commit hook runs the test job, which contains an exit 1, in the test script of package.json.
"scripts": {
  "test": "echo \"Error: no test specified\" && exit 1",
Changing it to exit 0 will make the commit work.
"scripts": {
-  "test": "echo \"Error: no test specified\" && exit 1",
+  "test": "exit 0",
Commit again:
git add . && \
git commit -m 'first commit'

In a real production project, you should specify your actual
testcommand, such as Jest, Playwright, etc.
2.2. Code Linting
For now, our pre-commit hook only includes a test command. Next, we'll add a Lint command to check the Code Style before you commit JavaScript code.
Install & Configure Linting Tools
Before Linting code in pre-commit hook, let's install and configure ESLint.
npm install -D eslint@9 @eslint/js@9
Create an eslint.config.js file with the code below:
// eslint.config.js

import pluginJs from "@eslint/js";

export default [
  pluginJs.configs.recommended
];
Note: I use
export default xxxhere because mypackage.jsonincludes the configuration"type": "module". If you don't have this configuration, usemodule.exports = xxxinstead.
Add Linting Script to package.json
"scripts": {
+  "lint": "eslint .",
Create a Demo index.js
// index.js

export const field = {
    "b": process.evn.bit,
}
Lint the Demo
npm run lint
This will produce some errors because we haven't defined the variable process in the demo code, which is not allowed according to the ESLint rule.

2.3. Integrate Linting into the Pre-Commit Hook
In the last step, we configured a command to lint our code style. Now, we're going to integrate it with the pre-commit hook.
Put Linting Command to Pre-Commit hook
Add npm run lint to the first line of .husky/pre-commit.
+npm run lint
npm test
Try A Commit
Now, all commits will trigger the execution of this linting command.
git add . && \
git commit -m 'second commit'
You'll encounter a failure because you must fix all the linting errors (mentioned above) before committing the code.

Fix the Linting Errors
Fix it by editing index.js:
// index.js

+const process = {
+    env: {
+        bit: 2
+    }
+}

export const field = {
    "b": process.evn.bit,
}
Commit again and it should work.
git add . && \
git commit -m 'commit after fix index.js'

2.4. Brief Sum-Up
By now, both npm run lint and npm test must pass in the pre-commit hook before you can commit code.
Better Linting
I only made a very simple ESLint configuration here, which may be insufficient for a production project. To integrate a robust linting toolchain, you can check out another post of mine to learn more: Mastering Code Quality: Setting Up ESLint with Standard JS in TypeScript Projects.

3. lint-staged
Have you noticed the problem with npm run lint in the pre-commit?
Yes, all your JavaScript files in the project are checked in this process. What is the problem, though?
Suppose you're working on a historical project with hundreds of JavaScript files that had never integrated linting tools or Git hooks before, meaning there may be numerous code style issues in the existing code.
Today, you integrated ESLint and Git commit hooks into the project, and tomorrow your teammate edits just one JavaScript file. However, they can't commit it because they are overwhelmed by all the historical linting issues in the whole project at once, which are identified by npm run lint.
Here’s another example:
You've spent a day developing a web page and have written several files like header.js, aside.js, main.js, footer.js, etc. But, only header.js is complete, the others are still under development.
Now it's 5 o'clock, time to call it a day! You decide to commit header.js first, but you encounter similar obstacles as in the previous example.
What we need is a way to commit only the "code we really want to commit right now", or more correctly, by Git terminology, the staged files.
In simple terms, staged files are those files you've added to the Git Staging Area by git add <filename>.
Only the code in the staging area should be linted with each commit.
Now, let's see how to get it done.
Install lint-staged
lint-staged is the second important tools we need here, install it via NPM.
npm install -D lint-staged
Configure lint-staged
Create a lint-staged.config.js file in the project root with the configuration below:
// lint-staged.config.js

export default {
  // You can lint other types of files with different tools.
  "*.{js,jsx,ts,tsx}": [
    // You can also add other tools to lint your JavaScript here.
    "eslint"
  ]
}

var b // I included this line to intentionally elicit an error output in ESLint later.
Note: I use
export default xxxhere because mypackage.jsonincludes the configuration"type": "module". If you don't have this configuration, usemodule.exports = xxxinstead.
Add lint-staged to NPM Script
  "lint": "eslint .",
+ "lint:staged": "lint-staged",
And of course, modify your hook command accordingly in .husky/pre-commit.
-npm run lint
+npm run lint:staged
Use lint-staged
Annotate the following code from index.js:
// index.js

+// const process = {
+//    env: {
+//        bit: 2
+//    }
+// }

export const field = {
    "b": process.evn.bit,
}
In this scenario, we have ESLint issues in both lint-staged.config.js and index.js, but let's say we don't want to commit index.js and ignore its ESLint issues for now.
To let lint-staged identify what you're going to commit, first add the file you want to commit to the Git Staging Area.
git add lint-staged.config.js # don't add index.js
Then, commit the file.
git commit -m 'test lint-staged'

This time, only the newly added(staged) file lint-staged.config.js is checked during your commit.
index.js was changed, and it obviously has ESLint errors, but it's not staged, so it's not checked in this commit.
You don't need to fix all the JavaScript files in the project, nor even all the JavaScript files you have modified, but just the staged file(s) you actually want to commit.
Let's comment out the line var b in lint-staged.config.js to fix its ESLint error, and then the commit will succeed.
-var b // I included this line to intentionally elicit an error output in ESLint later.
+// var b // I included this line to intentionally elicit an error output in ESLint later.
git add lint-staged.config.js && \
git commit -m 'test lint-staged'

lint-staged Other Files
There are more linting tools that I won't go into deeply, but you can integrate them with lint-staged. For example, you can lint your CSS content with Stylelint, or even lint your README files with markdownlint, etc.
Save other changes
Now we have some unsaved work.
git status

Before we move on to our next Git Hook, let's revert our last change in index.js and save our previous work.
// index.js

-// const process = {
-//    env: {
-//        bit: 2
-//    }
-// }
+const process = {
+    env: {
+        bit: 2
+    }
+}

export const field = {
    "b": process.evn.bit,
}
git add . && \
git commit -m "let's continue"

We're going to mention this "let's continue" later in our next Git Hook.
4. Commit Message Hook
In the previous steps, we introduced the Git Pre-Commit Hook, which activates immediately after you execute the git commit command but before the commit message editor opens or the commit is finalized.
And after that, after the Git Pre-Commit Hook is triggered, the next hook is the Commit Message Hook, or specifically speaking, the commit-msg script. In this hook, you're able to get the Commit Message from the commit message editor or from the message you provide via git commit -m 'message'.
Our next step is to validate the format of the commit message.
Why is format of the commit message so important?
Well, Git commit message is a semantic description of what you are going to do in a specific commit. It's a gateway to communicate with your teammates, code reviewers are easier to understand your intention without diving into the code.
Git commit message also improves traceability, by linking the commit to external resources like bug and task trackers through identifiers or tags, enhancing the traceability of work and the management of project documentation.
That's the significance of adhering to a standard format for commit messages promotes clarity, coherence, and collaboration within a team.
4.1. Commit Message Format Linting
Install Commit Message Linting Tools
commitlint is the most important tool we need for this step.
npm install --save-dev @commitlint/{cli,config-conventional}
Configure commitlint
Below is a simple (but conventional) configuration, adhering to the conventional commit format.
echo "export default { extends: ['@commitlint/config-conventional'] };" > commitlint.config.js
Note: I use
export default xxxhere because mypackage.jsonincludes the configuration"type": "module". If you don't have this configuration, usemodule.exports = xxxinstead.
Test commitlint
Run commitlint directly to verify the message we used in our last commit, checking if it meet the conventional commit format.
npx commitlint --from HEAD~1 --to HEAD --verbose
"from HEAD~1 to HEAD" is your latest commit
You will encounter the error:

Why Dose It Fail?
The command above is mimicking your last commit.
Do you recall what it was? Yes, it was git commit -m 'let's continue'.
In this case, your commit message is "let's continue", but we have a rule for the commit message format configured in commitlint.config.js, which stipulates that the commit message should be structured as follows:
<type>[optional scope]: <description>

[optional body]

[optional footer(s)]
i.e., your commit message must be at least formatted like "feat: your commit description ...".
However, Your message of "let's continue" doesn't satisfy the rule, which means your commit will fail.
We'll find out how to fix it later.
4.2. Add Message Format Linting to Commit Message Hook
Running commitlint directly is not appropriate; we should integrate it into an automatic Git Hook (Commit Message Hook).
Add Linting Script to the Hook
Create the Git Commit Message Hook file .husky/commit-msg and add execution of commitlint to it.
echo "npx --no -- commitlint --edit \$1" > .husky/commit-msg
You'll see a newly created file .husky/commit-msg with the content below:
+npx --no -- commitlint --edit \$1
Test the Hook
The Commit Message Hook is ready, now test it.
git add . && \
git commit -m "this will fail"
It fails because neither a type nor a subject is specified.

Make some slightly adjustments:
git commit -m "foo: this will also fail"
As foo is not a valid type, it fails again, But at least we have one less problem than the last commit.

Modify the message once more:
git commit -m "chore: this is a legal commit message"
Hooray!

4.3. Tailor your Commit Message Format
In real senarios, the conventional commit message format may not meet your team's requirements, sometimes you need to customise your rules.
For instance, your team is using Jira for project and product management, as well as issue tracking, etc. You and your teammates have agreed that every commit should include a Jira ticket ID, allowing you to trace back the real motivation (a product requirement, a technical optimization, a bug, etc.) of every code change.
To do this, edit your commitlint.config.js as follows:
// commitlint.config.js

export default {
  extends: ['@commitlint/config-conventional'],
  plugins: [
    {
      rules: {
        'subject-prefix-with-jira-ticket-id': parsed => {
          const { subject } = parsed
          const match = subject ? subject.match(/^\[[A-Z]{3,5}-\d+\]\s/) : null
          if (match) return [true, '']
          return [
            false,
            `The commit message's subject must be prefixed with an uppercase JIRA ticket ID.
    A correct commit message should be like: feat: [JIRA-1234] fulfill this feature
    Your subject: ${subject}
    Please revise your commit message.
    `
          ]
        }
      }
    }
  ],
  rules: {
    'subject-prefix-with-jira-ticket-id': [2, 'always']
  }
}
Note: I use
export default xxxhere because mypackage.jsonincludes the configuration"type": "module". If you don't have this configuration, usemodule.exports = xxxinstead.
Test it.
git add . && \
git commit -m 'chore: try to commit'
Oops! The commit fails as we just add a new rule to force a "JIRA ticket ID" in the commit message's subject.

Try another one:
git commit -m 'chore: [PRJ-1234] a commit with sample id' # the [PRJ-1234] is a fake ID
You've got it!

5. Git Push Hook
We have taken some steps to ensure our code style and commit message format in the previous steps. One further step is to ensure the code quality before it's pushed to the remote repository.
A Git Push Hook is triggered before a push (git push origin <branch>) occurs. You can use the Git Push Hook as another "firewall" to validate the code before it is pushed to the remote repository.
5.1. Incremental Code Linting
We have run npm run lint:staged in pre-commit. Does it ensure that there will be no unchecked code contaminating our codebase?
The answer is No. You can still commit code that hasn't been fixed by this:
git add . && \
git commit -m 'whatever I like' --no-verify
See the --no-verify flag? It can help you to skip pre-commit and commit-msg hooks we made above.
This allows for a forced commit. It's like a hidden time bomb! You're not even able to stop your teammates from doing it sneakily!
So, here we need a second defence line before the forced committed code is pushed to our remote repository and pollute the codebase.
I need to clarify what I mean by Incremental Code here.
Say we have the following commits: commit-a and commit-b have been pushed to the remote repository, and commit-c to commit-N (not sure how many commits in ...) have not been pushed yet.
| Commit | Commit time | push status |
|---|---|---|
| commit-N | today | not pushed |
| ... | today | not pushed |
| commit-d | today | not pushed |
| commit-c | today | not pushed |
| commit-b | yesterday | pushed |
| commit-a | the-day-before-yesterday | pushed |
Right now, we're going to push from commit-c to commit-N, and commit-c to commit-N represent the incremental code in this context.
First Push
Before making any changes and testing the incremental changes since the last push, it's important to push the code first.
Because later, we're going to make another push, which will be compared to this push as Incremental Code.
git push origin main

Incremental Code Linting Shell Script
Create a Shell script file named scripts/lint-incremental-push-files.sh.
mkdir scripts && \
touch scripts/lint-incremental-push-files.sh
In this Shell script, we'll identify those incremental JavaScript files we want to push, and then run the ESLint command only on them. Input the following code into lint-incremental-push-files.sh.
#!/bin/bash

# Ensure you have the latest info from your remote
git fetch

# Automatically identify the current branch and corresponding remote branch
BRANCH=$(git rev-parse --abbrev-ref HEAD)
REMOTE_BRANCH="origin/${BRANCH}"

# Find the last commit from the remote branch that has been pushed
LAST_PUSHED_COMMIT=$(git rev-parse ${REMOTE_BRANCH})

# Find the current commit
CURRENT_COMMIT=$(git rev-parse HEAD)

# List changed files since the last pushed commit that match the desired extensions
CHANGED_FILES=$(git diff --name-only $LAST_PUSHED_COMMIT $CURRENT_COMMIT | grep -E '\.(js|jsx|ts|tsx)$')

echo "Files to lint:"
echo $CHANGED_FILES

# Run ESLint on these files if any are found
if [ -z "$CHANGED_FILES" ]
then
    echo "No JavaScript/TypeScript files to lint."
else
    echo "Linting files..."
    ./node_modules/.bin/eslint $CHANGED_FILES
    if [ $? -ne 0 ]; then
        echo "Linting issues found, please fix them."
        exit 1
    fi
fi
Make the script executable:
chmod +x scripts/lint-incremental-push-files.sh
Add this script to a NPM script in package.json.
  "scripts": {
    "prepare": "husky",
    "lint": "eslint .",
    "lint:staged": "lint-staged",
+   "lint:incremental-push": "./scripts/lint-incremental-push-files.sh",
    "test": "exit 0"
  },
Create the Git Push Hook configuration file named .husky/pre-push, and add the NPM script to it.
echo "npm run lint:incremental-push" > .husky/pre-push
Now, this Shell script will run every time before your push. Your git push command will fail if the incremental code doesn't pass the ESLint check, meaning no force-committed code can pass through!
Test Incremental Code Linting
Now, let's make some changes.
Open index.js to add a simple line.
// index.js

const process = {
    env: {
        bit: 2
    }
}

export const field = {
    "b": process.evn.bit,
}

+var a
You can not commit it because we have a pre-commit hook to lint the file and we just made a ESLint error in it.
git add . && \
git commit -am 'bypass eslint to commit'

But you can bypass the check with --no-verify.
git commit -am 'bypass eslint to commit' --no-verify

Do a similar thing to eslint.config.js with a new line:
import pluginJs from "@eslint/js";

export default [
  pluginJs.configs.recommended
];

+var b;
Bypass the check process again.
git add . && \
git commit -am 'bypass eslint again to commit' --no-verify
Check and Push Incremental Code
Just now, we have two commits including index.js and eslint.config.js, in which there are actually ESLint issues, but they were committed using tricks (--no-verify).

The commits in the red rectangle are the so-called incremental changes to be pushed, but they should not be pushed since they have ESLint issues!
But don't panic, we've got your back! They won't be able to be pushed because they will face the punishment of the Git Push Hook we made above!
If you try to push the code:
git push origin main
All Incremental Errors will be caught!

You can not push them until fix the errors and commit again.
index.js:
-var a
+// var a
eslint.config.js:
-var b;
+// var b;
git add . && \
git commit -m 'fix: [TEST-01] fix ESLint errors' && \
git push origin main

5.2. Force test Before Push
Next, I'm going to modify our team's workflow.
I will move the npm test command from the Git Pre-Commit Hook hook to the Git Push Hook named pre-push.
This is because I decide to allow linted code commits, without the test verification. I mean, we allow "un-test" code to be commit, but don't allow them to be pushed.
To do that, edit ./husky/pre-commit:
npm run lint:staged
- npm test
And move the test command to the Git Push Hook.
echo "npm test" >> .husky/pre-push
Let's edit the package.json's test command to intentionally make the test fail:
"scripts": {
-  "test": "exit 0",
+  "test": "exit 1",
Now, if you try to push any code, you'll fail because we have an exit 1 in the command. This means the test process is not passed, preventing you from pushing the "un-tested" code to the remote repository.
git add . && \
git commit -am 'chore: [TEST-1234] test commit'

This would have failed if we hadn't removed npm test from pre-commit.
git push origin main
The push will fail because we just added a test in the pre-push hook, which means we need to ensure that the test succeeds before we can push our code.

Revert exit 1 to exit 0, or in a real production project, use your actual test scripts that can pass, your code push to the remote repository will succeed!
5.3 Force Push
Unfortunately, you can still bypass the pre-push check and force push the code by using the --no-verify flag, just as you can force a commit.
git push origin main --no-verify
Or, if you're using GitHub, you can even commit and push your code directly on the website.

To address this, we need server-side Git hooks or CI systems. However, these are more complex topics, and I won't delve deeply into them now. Perhaps I'll write another post to introduce them in the future.
Conclusion: DIY your Workflows
In this post, I've delved into detailed steps to normalise our teams' Git workflow. My approach is just a basic framework; there are many Git hooks I haven't mentioned here. You should customize your Git hooks to tailor them to your team's workflow.
For example, you may not agree with me that I move the npm test command from the Git Pre-Commit Hook to the Git Push Hook. Based on this post, I think you already know how to make your own choice and tailor your own workflows.
Here are some additional steps you might consider:
- Make use of the other Git Hooks I didn't introduce in this post to enhance your teamwork, such as
post-checkout,post-commit,pre-rebase, etc. - Implement specific rules for commit message formatting after discussing with your teammates.
- Perform both linting and testing in commits and pushes.
- Add other commands or scripts to your Git commit/push hooks, such as sending an IM message or an email to notify your teammates of your changes.
- Use your imagination to customize the workflow as you see fit.
Last but not least, any suggestions, corrections, questions, or disagreements will be greatly appreciated.


Top comments (0)